
Allow professionals access to add and modify the jurisdictions which display in their compliance summary.
Getting Started with Jurisdiction Modifications
Jurisdiction Modification Default Settings
Understanding the Jurisdiction Settings Table
Enabling/Disabling Settings per Jurisdiction(s)
Impact to Professionals - Modifications
Impact to Professionals – Approval Requests
Approval Request Best Practices
Getting Started with Jurisdiction Modifications
Your organization has a few options to choose from when deciding how much access to grant professionals to jurisdiction data. The settings available exist at the organization level. Administrators can set a default behavior and also have access to define the user experience, on a jurisdiction-by-jurisdiction basis.
The first decision to make is to determine the default behavior across your site as new jurisdictions are added.
By default, do you want users to add or modify their jurisdiction data? Or, by default do you want modification disabled? Find these default settings within the Settings sidebar menu, under Approval Workflows. The selections you choose within this menu, will apply to new jurisdictions when added to your site.
Jurisdiction Modification Default Settings
Review the settings available within this section of Approval Workflows.
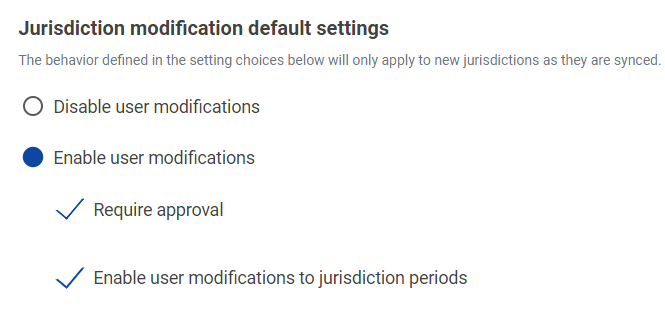
- Disable user modifications: Choose this option if you do not want your professionals to add or modify their jurisdictions.
- Enable user modifications: Choose this option if you would like your professionals to have access to modify existing, or add new, jurisdictions.
- Enable user modifications- require approval: Choose this option, after enabling user modifications, if professionals must ask for approval before the add/or modification is finalized. Enabling this setting will initiate the Approval Process for jurisdictions.
- Enable user modifications to jurisdiction periods: Choose this option, after enabling user modifications, if you would like your professionals to have access to modifying the reporting periods for each jurisdiction.
Understanding the Jurisdiction Settings Table
Organizations can further modify access to jurisdiction data on a jurisdiction-by-jurisdiction basis. These settings exist within the Jurisdictions tab of the Settings sidebar menu. As a reminder, the Approval Workflows tab is where default behavior is defined; the Jurisdictions tab will be where one-off adjustments can be made to existing jurisdictions.
Let’s review the data contained in this tab.
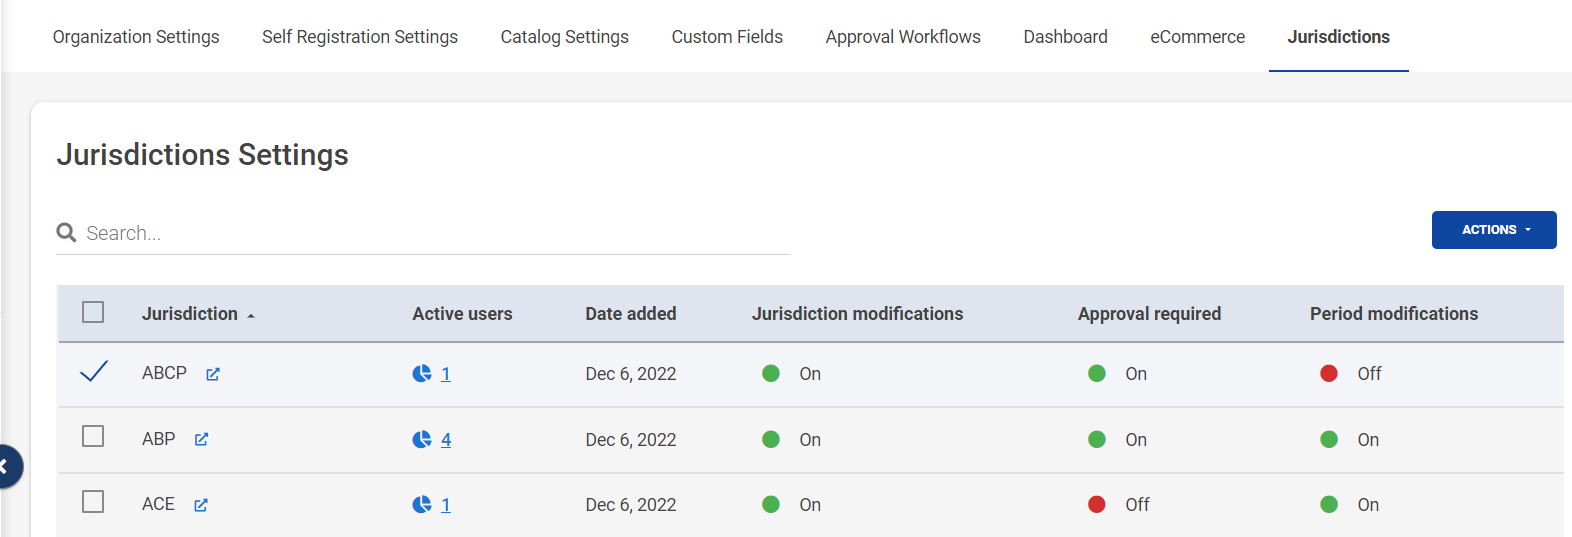
- Jurisdiction: This sortable column highlights the name of the configured jurisdiction. Note the icon to the right of the jurisdiction name. This will open a new tab to an external site housing the rule guidance for that jurisdiction.
- Active Users: This column will highlight the number of active users in the jurisdiction. A user is active if their account is active. This value is a hyperlink which will navigate you to the Firm Compliance table for this jurisdiction, detailing the users associated.
- Date Added: This column will return the date the jurisdiction was synced to your site. For jurisdictions which existed before the release of this feature, the date returned will be Nov 4, 2021. For any jurisdictions made available on your site after this date, this column will return the exact date the jurisdiction was synced. Use this column to determine which new jurisdictions have been added and whether settings need to be modified.
- Jurisdiction modifications: This column will show whether modifications have been enabled/disabled for the jurisdiction. If red, the setting has been disabled. Professionals will not have access to add or modify this jurisdiction within their account. If green, professionals will have access to add and modify this jurisdiction within their account.
- Approval required: This column will show whether approval has been required for the jurisdiction. If red, professionals will not be required to request approval when adding or modifying this jurisdiction within their account. If green, professionals will be required to request approval before the jurisdiction can be added or modified within their account.
- Period modifications: This column will show whether modifications have been enabled/disabled for the jurisdiction’s reporting periods. If red, professionals will not have access to edit reporting periods for this jurisdiction. If green, professionals will have access to modify these reporting period details. Reporting period modifications would grant access to:
- the Status of the jurisdiction (whether it was active, inactive, or exempt)
- the License Status of the jurisdiction (whether it was active, inactive, active- reinstated, expired, retired, relinquished)
- Extensions: the ability to apply an extension to the reporting period
- Requirement Adjustments: the ability to adjust the requirements in a reporting period
- Notes
- Flags: the ability to further modify the requirements on the reporting period
- Marking a jurisdiction of primary
Enabling/Disabling Settings per Jurisdiction(s)
To further modify the settings on a jurisdiction-by-jurisdiction basis, navigate to the Jurisdiction Settings tab. Use the selection on the left-hand side of the table to specify a jurisdiction, or group of jurisdictions. Select the Actions menu to expose options to either disable or enable user modifications.
When a single jurisdiction has been selected, and when the action to enable user modifications has been chosen, this modal will reference the current settings for the jurisdiction.
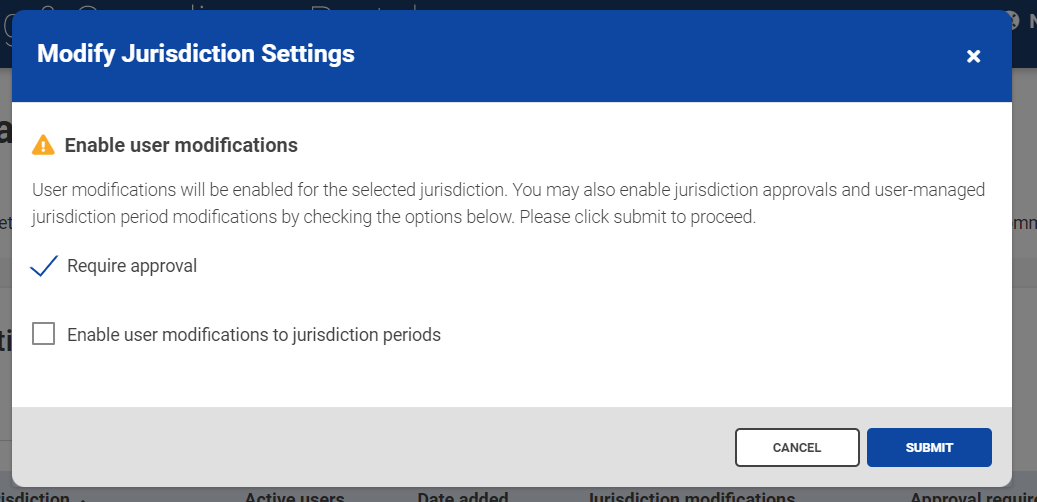
If, however, you select multiple jurisdictions with alternating settings, the modal will showcase both options un-checked. In this case, the modal will display a cautionary message noting that any adjustments made will override the existing settings for all jurisdictions specified.
Changes submitted are immediately reflected within the table after you save your changes.

Impact to Professionals - Modifications
If your organization has enabled modifications on at least one jurisdiction, professionals will see a link to My Jurisdictions within their profile menu. A user’s profile menu is located on the top right of their screen, within a drop down beneath their name. A professional will be navigated from this link to a jurisdiction list page, with access to the button Add Jurisdiction along with access to view any other jurisdictions associated to their account.
If a jurisdiction has been flagged as one that a professional can modify, they will have access to add that jurisdiction and modify its details. If access has been disabled, this jurisdiction won’t be an option to add and if already added, it won’t be accessible to modify.
If a jurisdiction’s periods have been flagged as data that can be modified, a professional will see an edit button where changes can be made.
Impact to Professionals – Approval Requests
When a jurisdiction requires approval, a professional must submit their request, they will not have the option to save changes. Requests submitted for approval are sent directly through the approval queue. Professionals can keep track of pending, approved, and denied requests by checking their profile menu and selecting the Approval Requests link. Professionals will have access to filter submissions by status, filter by date submitted and filter by date approved.
If your organization has set up Approval Notifications, professionals will also receive these emails when triggered.
Approval Request Best Practices
Notifications
If your organization is requiring approval for any jurisdiction, we advise utilizing the notification templates available to alert professionals to submitted, approved, and denied requests.
The specific notification templates available for this workflow are:
- Approval Request Approved User Notification: Configure this notification template if you wish for professionals to receive an email when their request has been approved.
- Approval Request Denied User Notification: Configure this notification template if you wish for professionals to receive an email when their request has been denied.
- Approval Request Submitted for Approval: Configure this notification template if you wish for administrators to get a notification that a request has been submitted for approval.
- Approval Request Reminder Admin Notification: Configure this notification template if you wish for administrators to get a reminder that a request is pending.
Navigating the Administrative Approval Menu
The Approvals menu for administrators is accessible from the left sidebar menu within Organization. This table includes filters for:
- Request Type: The approval processes which have been enabled on your site will be exposed here. Look for Jurisdiction Approval to review specific requests for jurisdiction modifications.
- Status: This filter will include all potential statuses for requests submitted: Pending, in addition to Denied and Approved.
- Submitted Date Range: Use this filter to locate submissions sent within a specific timeframe.
The Approvals table will return all requests submitted by your professionals. To gain more information about a request, use the row action menu located on each row, on the far right of the request.
- Choose Add Note to add a comment related to the request.
- Choose Review to be navigated into the pending request. Administrators will have access to modify, approve, or deny the request.
- Choose History to review comments submitted by both the professional and administrator for the specific request.
Review Submitted Requests
After you have selected Review, you will be navigated into the pending approval request. Scroll to Request Details to modify the request or select Select Action to choose Approve Request or Deny Request.
Impact of Approved and Denied Requests
Approved Requests
If a request is approved, the jurisdiction or jurisdiction modification, will be immediately visible to the professional from all relevant areas of the site (Compliance Summary and Compliance Detail menus).
The professional’s Approval Requests menu will retain the submission and will mark the request approved. Notifications will only be triggered to the professional if the organization has configured the appropriate notification templates.
The professional will have continued access to make additional requests to that jurisdiction, unless the setting for that jurisdiction has changed.
Denied Requests
If a request is denied, the requested changes will not be applied to the jurisdiction.
The professional’s Approval Requests menu will retain the submission but will mark the request denied. Notifications will only be triggered to the professional if the organization has configured the appropriate notification templates.
The professional will have continued access to make additional requests to that jurisdiction, unless the setting for that jurisdiction has changed.
Reporting on Approvals
Administrators can utilize our Approval Request report to retrieve information in bulk regarding pending, approved and denied submissions. Use this reporting option to create saved reports or scheduled reports if you wish to get a reoccurring snapshot of the requests coming in from your professionals.