Configure a payment processor and offer sessions for sale to professionals.
Enable, Configure, and Test eCommerce
Stripe Taxation Options
Data Privacy and Security
Set a Session for Sale
Manage Programs: Filter by Sessions Available for Sale
Set eCommerce Permissions
View Transactions
Reporting
Enable, Configure, and Test eCommerce
If eCommerce has been enabled for your site, Admins will have the ability to configure a payment processor and offer sessions for sale to professionals.
The professional's guide to purchasing sessions for sale can be referenced here: User Guide: Purchase a Session for Sale.
Enable eCommerce
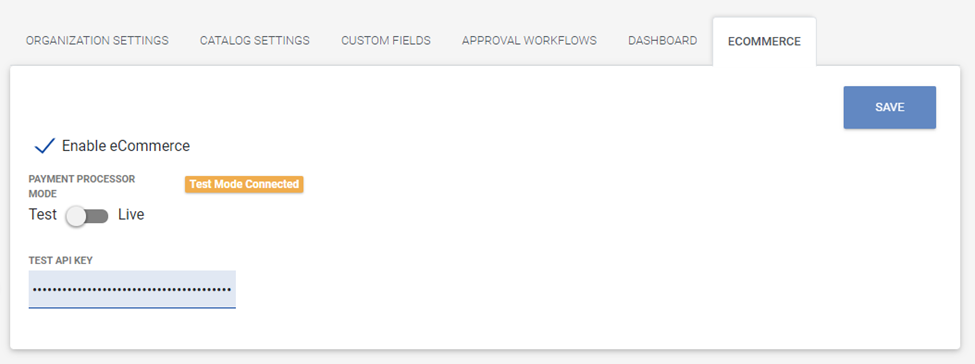
When eCommerce is activated, the eCommerce tab within Settings will be displayed.
Select the eCommerce tab to enable eCommerce and configure Stripe as the payment processor.
Configure eCommerce Payment Processor - Stripe
There are two ways to set up your payment processor integration: Test Mode or Live Mode.
Test Mode
When Test mode is enabled, transactions can only be completed with test Credit Card numbers.
On the eCommerce tab in Settings, toggle to Test Mode to enter the Test API Key provided by Stripe and select Save. If the Test API key is valid, a status message will indicate that test mode is active.
Note: Test Mode should be used when you are initially setting up and testing your site's eCommerce functionality internally. No money will be transferred. Stripe will record if the transaction succeeded or failed and that the transaction took place in Test mode.
Live Mode
Live mode should be used when you are ready to launch and sell sessions. All transactions in live mode are real transactions, and money will be transferred. Once you’ve offered sessions for sale, you should stay in live mode indefinitely.
On the eCommerce tab in Settings, toggle to Live Mode to enter the Stripe Live API Key and select Save. If the Stripe API key is valid, a status message will indicate that live mode is active.
Once live mode is active, you can begin processing real transactions immediately. If you would like to confirm, set a session to $1.00 and use a valid credit card to purchase.
Stripe Resources
- Create an account in Stripe and set up Stripe Checkout: https://stripe.com/
- Learn more about Stripe’s modes and API keys: https://stripe.com/docs/keys
- Access Stripe’s test card numbers: https://stripe.com/docs/testing#cards
Stripe Taxation Options
Stripe supports two methods for taxation that LCvista will account for during the checkout process: Stripe Tax and Tax Codes.
Note: LCvista will first check to identify if any active Tax Codes exist for your Stripe account. If LCvista does not identify any active Tax Codes, LCvista will then attempt to utilize the automated Stripe Tax method.
Stripe Tax
Stripe will automatically calculate and collect sales tax during checkout. Stripe Tax charges a fee based on volume.
Learn more about setting up Stripe Tax here: https://stripe.com/docs/tax/set-up
Tax Codes
Alternatively, Stripe supports the ability to define a catalog of tax rates. Stripe does not charge for this method. Using Tax Codes may be necessary for your organization if custom tax rates are required (for example, tax rates might vary based on time period).
Learn more about setting up Tax Codes here: https://stripe.com/docs/tax/products-prices-tax-codes-tax-behavior
Data Privacy and Security
LCvista does not accept, process, store, or transmit credit card information or any cardholder data. LCvista does not act as a service provider, payment application, or a payment gateway. During the payment process, the user’s browser is redirected to a checkout and payment page that is entirely controlled by a third-party payment application.
LCvista stores the following data with each transaction:
- Username and Email Address
- Order ID
- Order Date
- Subtotal
- Total
- Session(s) Purchased
LCvista does not store, and has no access to, the following data:
- User billing address
- User credit card information, payment methods, or invoices
- Refunds issued
- Payouts issued
- Disputed payments
Any concerns or questions regarding payments and transactions should be sent directly to the payment processor.
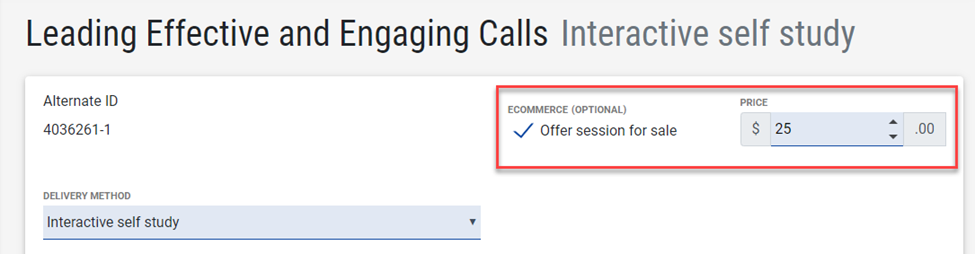
Set a Session for Sale
Adding a New Session
When creating a new session or editing an existing session, enable the option to “Offer session for sale” and enter a price.
Note: Prices are at the whole dollar value. By default, all prices are in US Dollars.
Waitlist Limitations
Note that waitlists are not supported with eCommerce-enabled sessions. Both options cannot be enabled at the same time.
Entering a Maximum Enrollment Limit value after enabling the option to Offer session for sale will return an error.
Alternatively, enabling the option to Offer session for sale after having entered a Maximum Enrollment Limit value will return an error.
Editing a Session
While Admins do have the ability to edit a session with eCommerce enabled (Offer session for sale is selected), changing certain values can impact the checkout process.
For example:
- Modifying the Enrollment Start or End Dates and/or the Session Start or End Dates may result in the session being removed from an end user’s shopping cart during checkout if the session is no longer enrollable.
- If an Admin changes the session’s price or disables eCommerce for the session, this will result in the session being removed from an end user’s shopping cart during checkout.
Attempting to save an edited session with eCommerce previously enabled will return a warning: This session is currently offered for sale. Any edits made to this session may impact users who have previously purchased this session or currently have the session in their shopping cart.
Deleting a Session
While Admins do have the ability to delete a session with eCommerce enabled (Offer session for sale is selected), doing so has an impact and introduces potential risk and issues for those users who have already purchased the session or currently have that session in their shopping cart.
Deleting a session with eCommerce enabled will return a confirmation message: This action will delete this session and all associated session records; any users with a passed status will be reapplied. This session is offered for sale; this action will impact any users who have previously purchased this session. This action cannot be undone. Please confirm.
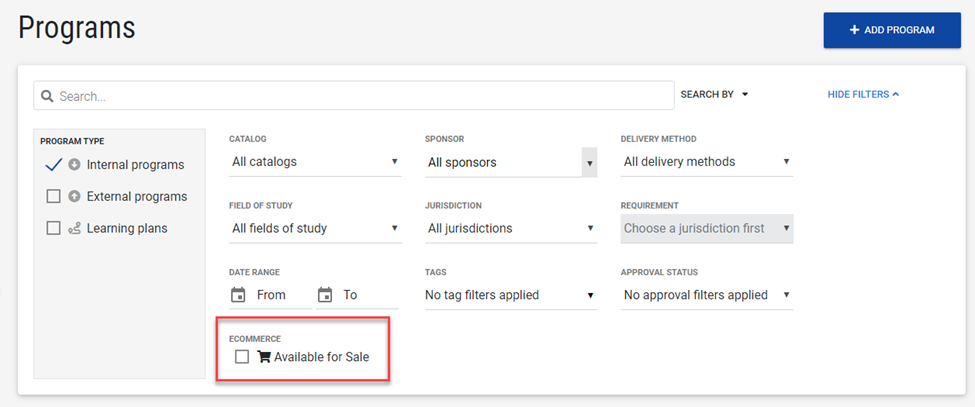
Manage Programs: Filter by Sessions Available for Sale
When eCommerce is enabled, the Manage Programs page will display a new program type filter: Available for Sale.
Selecting this checkbox will return programs where at least one session is offered for sale.
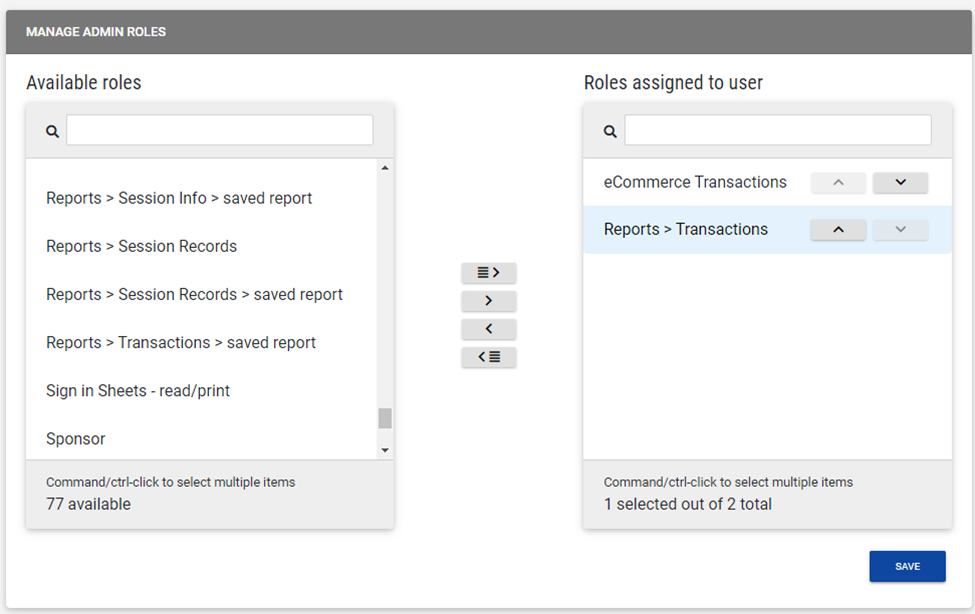
Set eCommerce Permissions
Add or remove permissions for users and/or groups specific to eCommerce.
The eCommerce Transactions permission allows a user to:
- Access the Transactions Summary and Details pages
Note: Transactions are limited to Managed Users.
The Reports > Transactions and Reports > Transactions > saved report permissions allow a user to:
- Run and view the Transactions Report
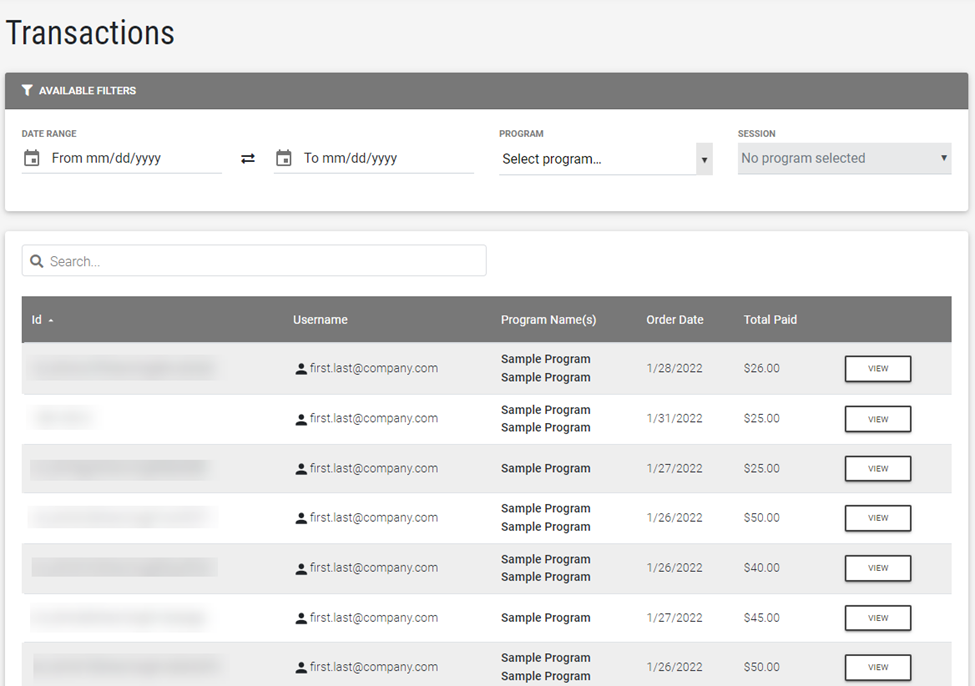
View Transactions
To review a history of sessions purchased, select Transactions from the Organization menu.
Transaction Summary
The Transactions table lists all sessions purchased including:
- Transaction ID
- Username
- Order Date
- Program and Session names
- Total Paid
The Transactions table can by filtered by Date Range, or by selecting a specific Program and Session.
Select View to open a detail view for the selected transaction.
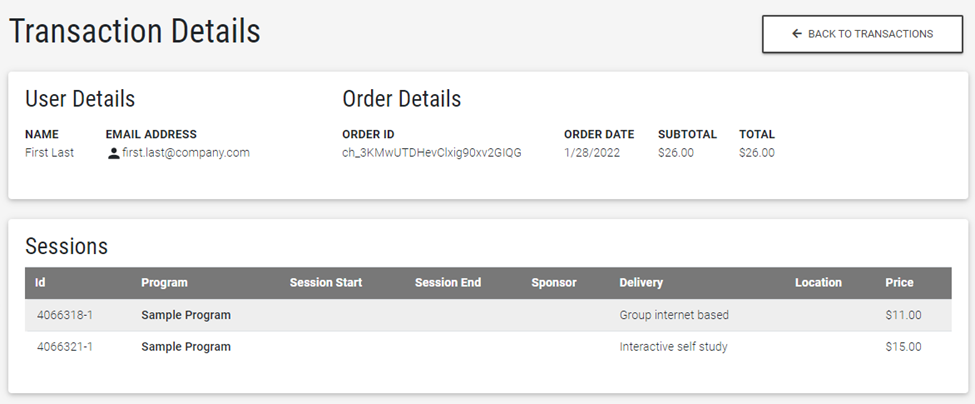
Transactions Details
The Transaction Details page outlines additional details for the user, the transaction, and the session(s) purchased.
Select Return to Summary to navigate back to the Transaction Summary page.
Note: The Default Admin or eCommerce Transactions permission must be assigned in order to gain access to the Transaction Summary and Details pages.
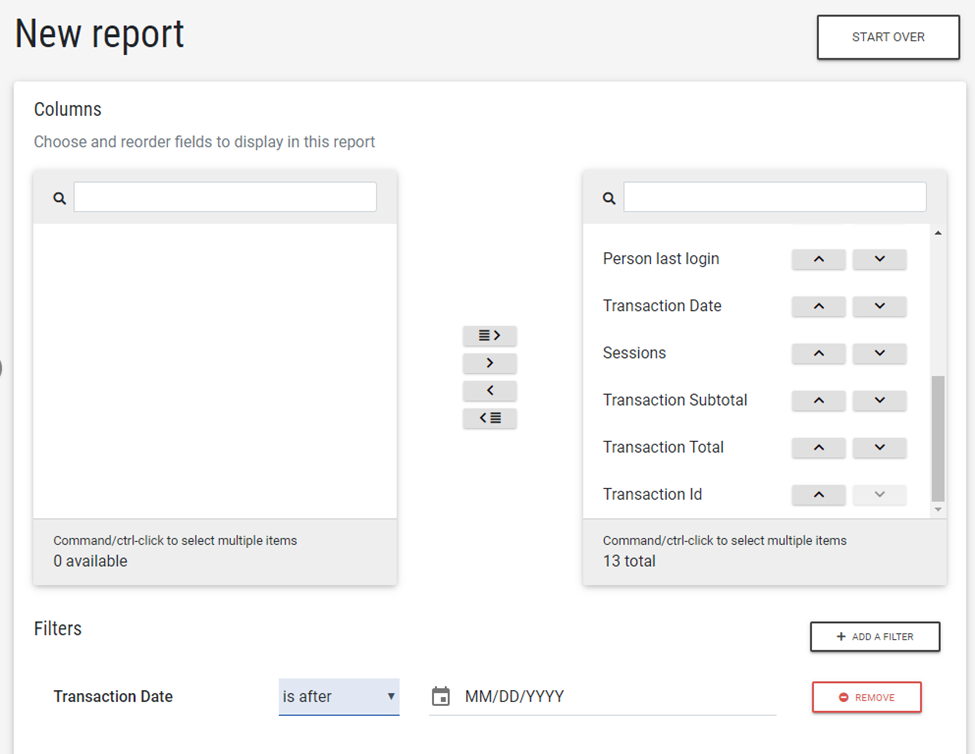
Reporting
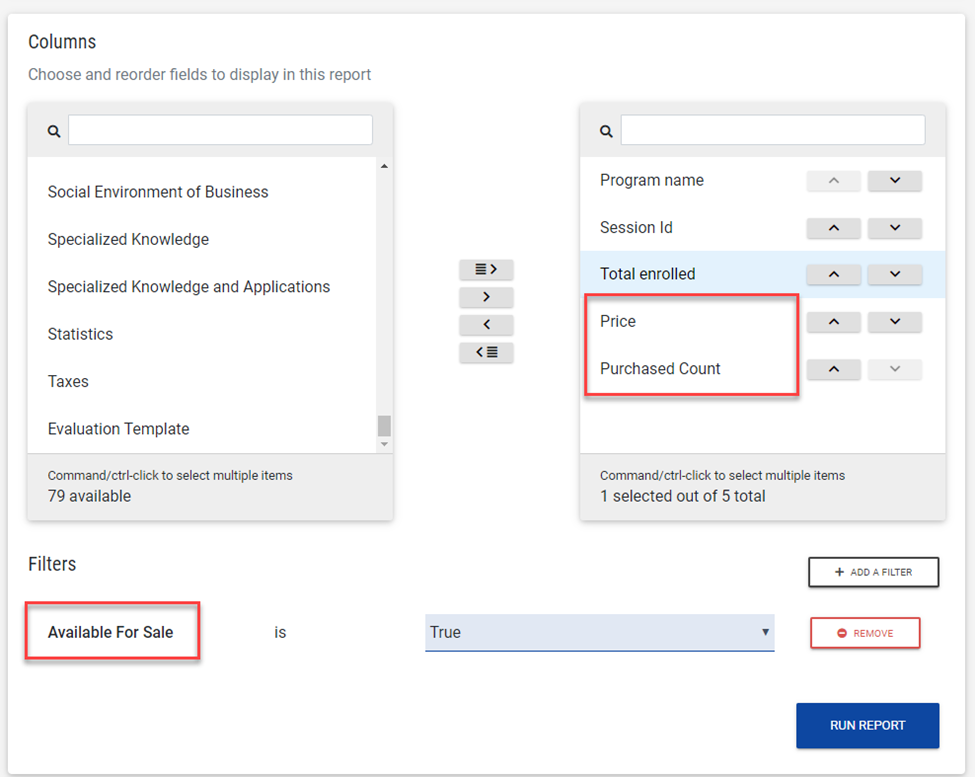
Report on Sessions Available for Sale
Use the Sessions Info Report to filter and track which sessions are available for sale, the price of that session, and how many times the session has been purchased.
Column options include:
- Price
- Purchased Count
Filter options include:
- Available for Sale
Report on Transactions
Use the Transactions report to return the transaction history for sessions set for sale in your organization and purchased by your professionals. Each row represents an individual purchase, along with basic user detail and purchase amount. Use this report to review details about transactions processed.
Note: The Default Admin, Reports > Transactions, or Reports > Transactions > saved report permission must be assigned in order to gain access to the Transactions Report.