
This integration allows administrators access to create, manage and process CPE for Microsoft Teams sessions in LCvista.
Setting up the Microsoft Teams Integration
Gathering API Credentials - Microsoft Teams Delegated Credential
Gathering API Credentials - Microsoft Teams Application Credential
Microsoft Teams-LCvista Data Flow
Integrations
For more information on the Integrations feature, and best practices for using this workflow, please refer to our article on Integrations.
Continue reading this article to learn more about creating, managing and processing CPE for Microsoft Teams meetings in LCvista.
Setting up the Microsoft Teams Integration
When setting up the Microsoft Teams integration within LCvista, there are two Provider options to select from.
- Microsoft Teams (Delegated Credential). Using this method, firms will need to set up credentials for every Microsoft Teams Meeting Organizer. For more information on setting up this credential, please refer to Gathering API Credentials- Microsoft Teams Delegated Credential.
- Microsoft Teams (Application Credential). Using this method, an Azure administrator will be needed to assist in creating this specific application. This credential type allows firms to set up this integration once, for all participating Teams Meeting Organizers. Unlike the Delegated Credential, it will not be required to set up per Meeting Organizer. For more information on setting up this credential, please refer to Gathering API Credentials - Microsoft Teams Application Credential.
Microsoft Teams-LCvista Data Flow
See a diagram of the dataflow of the communications between LCvista and Microsoft Teams.

Gathering API Credentials- Microsoft Teams Delegated Credential
This section documents the process to gather the API credentials required for the Microsoft Teams Delegated Credential workflow.
Before entering your Provider Credentials into LCvista, take note of the items which will be requested by Microsoft Teams.
Each Meeting Organizer will need to follow this process in order to generate their own provider credentials. These credentials will then need to be added into the Provider framework within LCvista.
- Client ID: This value is supplied after creating a new App Registration through Microsoft Azure.
- Client Secret: This value is supplied after creating a new App Registration through Microsoft Azure.
To get both the Client ID and Client Secret, you will need to add a new registration via Microsoft Azure.
The steps to generate this information are as follows:
Step 1: Access URL: https://portal.azure.com/#home
Step 2: Search for App registrations
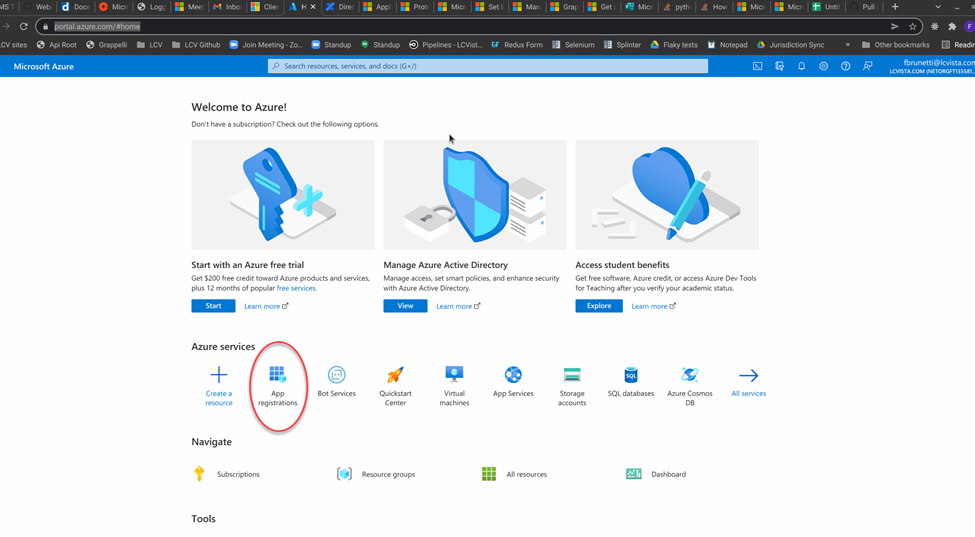
Step 3: Add New registration

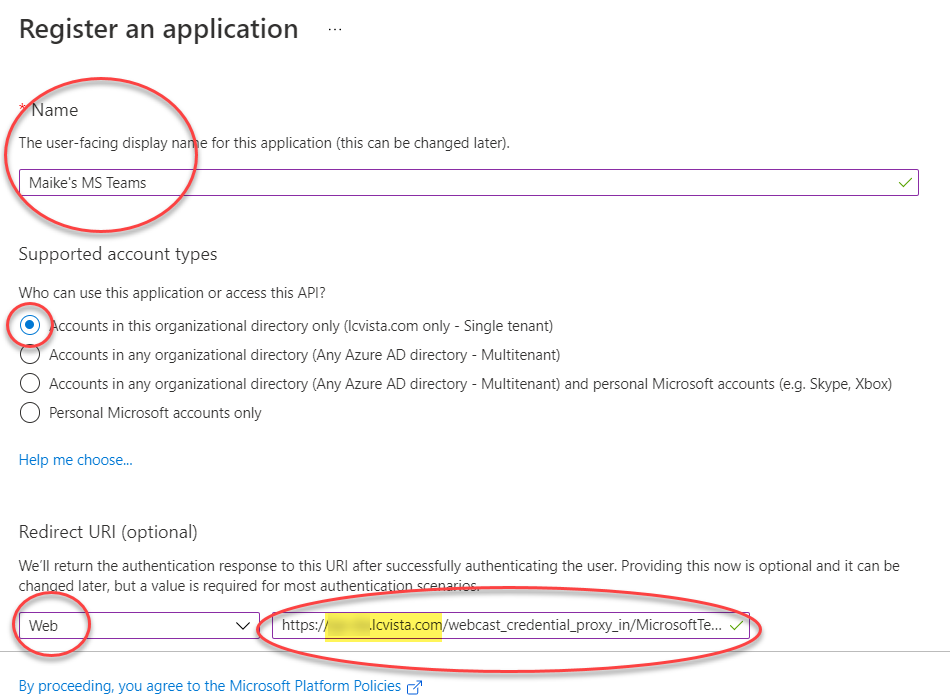
Step 4: Complete application registration.
-
Name: must be populated.
-
Supported account types: Single tenant selection
-
Redirect URI: select Web, and populate URL field with: https://sitename.lcvista.com/webcast_credential_proxy_in/MicrosoftTeamsUtility/
Note: Your Redirect URI will be specific to your site. Replace sitename with your site name.
Step 5: Select Register
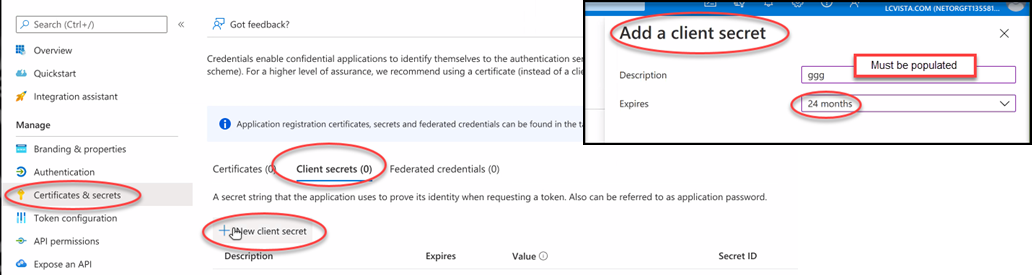
Step 6: Under Certificates & secrets, add New client secret
-
Populate the Description field
-
Expires: choose 24 months
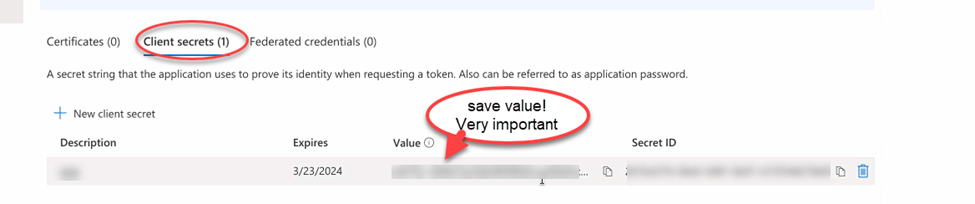
Step 7: After adding, save the Value. This detail will be used to populate the Client Secret requested within LCvista. Microsoft will not show this value to you again.
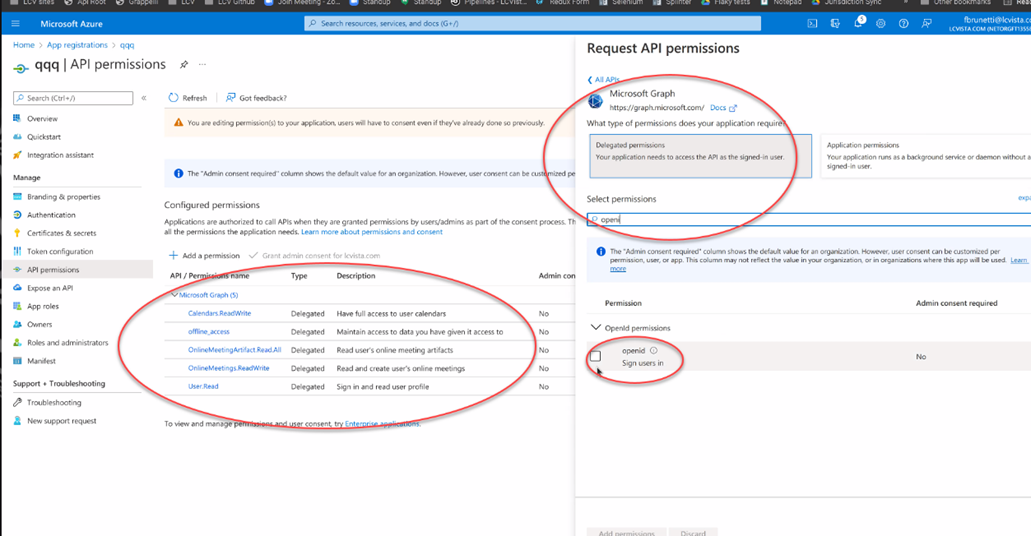
Step 8: Add API permissions

Step 9: From Add a permission> access Microsoft Graph > Delegated Permissions and search for the list below.
Note! The Azure administrator configuring these permissions must be authorized to consent on behalf of the organization.
- Calendars.ReadWrite
- offline_access
- OnlineMeetingArtifact.Read.All
- OnlineMeetings.ReadWrite
- User.Read
- Openid
Step 10: In LCvista, you will be asked for the Client ID and Client Secret. See next section on Entering Provider Credentials, for more details.
Gathering API Credentials- Microsoft Teams Application Credential
This section documents the process to gather the API credentials required for the Microsoft Teams Application Credential workflow. Before entering your Provider Credentials into LCvista, take note of the items which will be requested by Microsoft Teams.
An Azure administrator will be needed to assist in creating this application. Your firm will only need to create this application once. These credentials will then need to be added into the Provider framework within LCvista.
- Name: this is the title you can give to your Microsoft Teams account within LCvista
- Tenant ID: this value will be available after your application is created, found within the Overview tab, under Directory (tenant) ID within Microsoft Azure.
- Client ID: this value will be available after your application is created, found within the Overview tab, under Application (client) ID within Microsoft Azure.
- Client Secret: This value is supplied after creating a new App Registration through Microsoft Azure.
The steps to create this application in an effort to gather: Tenant ID, Client ID and Client Secret, are found below.
Step 1: Access the following as an Azure Administrator, URL: https://portal.azure.com/#home
Step 2: Search for App registrations
Step 3: Add New registration
Step 4: Complete application registration.
-
Name: must be populated.
-
Supported account types: Single tenant selection
Step 5: Select Register
Step 6: Under Certificates & secrets, add New client secret
-
Populate the Description field
-
Expires: choose 24 months
Step 7: After adding, save the Value. This detail will be used to populate the Client Secret requested within LCvista. Microsoft will not show this value to you again.
Step 8: Add API permissions
Step 9: From Add a permission> access Microsoft Graph > Application Permissions and search for the list below
Note! The Azure administrator configuring these permissions must be authorized to consent on behalf of the organization.
- Calendars.ReadWrite
- OnlineMeetingArtifact.Read.All
- OnlineMeetings.ReadWrite.All
- User.Read.All
Step 10: Configuring an Application Access Policy
All application credentials must be configured with an Application Access Policy. The following steps must be performed in a PowerShell session by an Azure admin.
Prerequisites
- Windows PowerShell 5.1 or later
- .NET Framework 4.7.2 or later
- PowerShellGet module
- Run the following command to install PowerShellGet if not already installed:
Install-Module -Name PowerShellGet -Force -AllowClobber
- Run the following command to install PowerShellGet if not already installed:
- Teams PowerShell module
- Run the following command to install the Teams PowerShell module if not already installed:
Install-Module -Name MicrosoftTeams -Force -AllowClobber
- Run the following command to install the Teams PowerShell module if not already installed:
More information:
https://docs.microsoft.com/en-us/microsoftteams/teams-powershell-install
Step 11: Designing your Application Access Policy
An application access policy allows an Azure app to access a user's data. A user can have only one policy assigned to them at a time. A policy may be applied globally, or it may be assigned to specific users. An application access policy that has been assigned to a specific user will always take precedence over a global policy. Thus, the precise steps required will depend on each organization's particular circumstances. Potential scenarios include:
- Scenario 1: You have decided to grant policy globally, and no users have existing policies
Steps required:
- create new policy
- grant policy globally - Scenario 2: You have decided to grant policy globally, and some users have existing policies
Steps required:
- create new policy
- grant policy globally
- update existing user policies to include your new LCvista Teams Azure app id - Scenario 3: You have decided to grant policy to specific users, no users have existing policies
Steps required:
- create new policy
- grant policy to specific users - Scenario 4: You have decided to grant policy to specific users, some users have existing policies
Steps required:
- create new policy
- grant new policy to specific users that have no pre-existing policy assigned to them
- update existing user policies to include your new LCvista Teams Azure app id - Scenario 5: All users have existing policies assigned to them
Steps required:
- update existing user policies to include your new LCvista Teams Azure app id
Step 12: Sample PowerShell commands
Once you have decided on how you would like your access policy to be configured, execute the following commands in a PowerShell session to complete the Application Access Policy set up process. After authenticating your PowerShell session and loading the Teams PowerShell module, the exact commands you will need to run will depend upon which scenario outlined above corresponds to your organization's circumstances.
After completing this step, you can enter the required provider credentials into LCvista. For more on where to enter this information, jump to Entering Provider Credentials: For Microsoft Teams (Application Credential)
- Authenticate your PowerShell session:
- Connect-MicrosoftTeams
- A browser window will open. Select the MS account you would like to use. This account must have Azure admin privileges.
- Load Teams PowerShell module:
- Import-Module MicrosoftTeams
- Create a new application access policy:
- New-CsApplicationAccessPolicy -Identity "MyApplicationAccessPolicyName" -AppIds "bb9419c4-447e-4ffc-bd5b-e61485073504" -Description "My application access policy description"
- The AppIds parameter should be replaced with the Application (client) ID of the Azure app registration that you have just created.
- Grant an application access policy globally:
- Grant-CsApplicationAccessPolicy -PolicyName "MyApplicationAccessPolicyName" -Global
- Note that the PolicyName parameter in this command should match the Identity property of the policy you are assigning
- Grant an application access policy to a specific user:
- Grant-CsApplicationAccessPolicy -PolicyName "MyApplicationAccessPolicyName" -Identity "464a1116-7530-44a1-b78d-8c603fd7e380"
- Note that the PolicyName parameter in this command should match the Identity property of the policy you are assigning. The Identity parameter in this command should be the Microsoft user UUID of the user you are assigning.
- Update an existing application access policy with a new app id:
- Set-CsApplicationAccessPolicy -Identity "MyApplicationAccessPolicyName" -AppIds @{Add="5817674c-81d9-4adb-bfb2-8f6a442e4622"}
- Note that the Identity parameter in this command should match the Identity property of the policy you are updating. The AppIds parameter should be replaced with the Application (client) ID of the Azure app registration that you have just created.
- Other useful commands
- List application access policies:
- Get-CsApplicationAccessPolicy
- Note that this command can also be run with an Identity parameter to return a particular policy. See official documentation link below for usage details.
- List users:
- Get-CsOnlineUser
- Any pre-existing application access policies will be displayed under the ApplicationAccessPolicy property for each user. Note that this command can also be run with an Identity parameter to return a particular user. See official documentation link below for usage details.
- List application access policies:
More information
- https://docs.microsoft.com/en-us/graph/cloud-communication-online-meeting-application-access-policy
- https://docs.microsoft.com/en-us/powershell/module/skype/new-csapplicationaccesspolicy?view=skype-ps
- https://docs.microsoft.com/en-us/powershell/module/skype/get-csapplicationaccesspolicy?view=skype-ps
- https://docs.microsoft.com/en-us/powershell/module/skype/grant-csapplicationaccesspolicy?view=skype-ps
- https://docs.microsoft.com/en-us/powershell/module/skype/get-csonlineuser?view=skype-ps
Entering Provider Credentials
For Microsoft Teams (Delegated Credential).
From the Provider menu within LCvista, click on the Add Provider button and enter the credentials requested below.
- Name: this is the title you can give to your Microsoft Teams account within LCvista
- Client ID: This value is supplied after creating a new App Registration through Microsoft Azure. See Gathering API Credentials for more detail. Locate this value on the Overview tab from your new App Registration, under Application (client) ID.
- Client Secret: This value is supplied after creating a new App Registration through Microsoft Azure. See Gathering API Credentials for more detail. This detail is the Value you are given access to during Step 7.
Select Validate to confirm credentials. Once validated, you will be navigated back to Microsoft Azure to confirm permissions. Once this process is complete, your credentials will be saved within LCvista.
Please note, this is a process that each Microsoft Teams organizer will need to follow in order to use this integration.
If your firm uses more than one provider, you may add multiple providers upon setup.
For Microsoft Teams (Application Credential).
From the Provider menu within LCvista, click on the Add Provider button and enter the credentials requested below.
- Name: this is the title you can give to your Microsoft Teams account within LCvista
- Tenant ID: this value will be available after your application is created, found within the Overview tab, under Directory (tenant) ID within Microsoft Azure.
- Client ID: this value will be available after your application is created, found within the Overview tab, under Application (client) ID within Microsoft Azure.
- Client Secret: This value is supplied after creating a new App Registration through Microsoft Azure.
Select Validate to confirm credentials.
Creating a Session
Once set up of Provider and Rulesets are complete, you can begin to create sessions within LCvista. For more information on creating Integrated Provider sessions, see article Integrations and the section on Creating Your Session.
In addition to the standard fields, Webcast Credentials and Integration Provider Ruleset, you will be asked to provide the following data when creating a Microsoft Teams session within LCvista, for both Microsoft Teams (Delegated Credential and Application Credential):
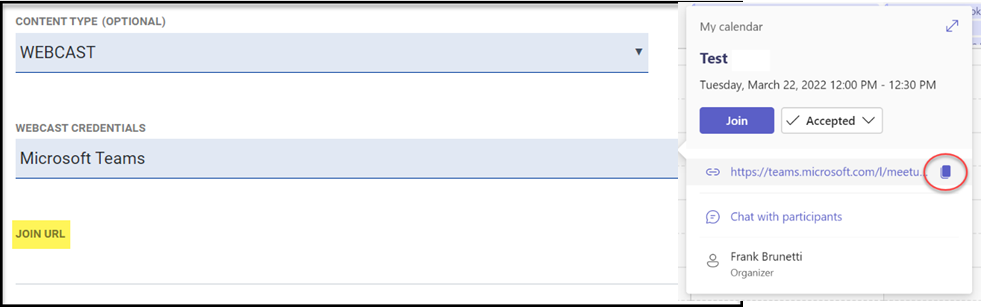
- Join URL. This will be the Microsoft Teams meeting link accessible from the calendar appointment.
- Meeting Organizer. For firms using the Microsoft Teams (Application Credential) you will be required to indicate the Meeting Organizer from the drop down available. This is for this credential only, and will not be required for firms using the Microsoft Teams (Delegated Credential). The account selected should be tied to the same email address associated to the Microsoft Teams Meeting Organizer of the event.
Please find a helpful screenshot here on where you can retrieve the correct Join URL from Microsoft Teams:
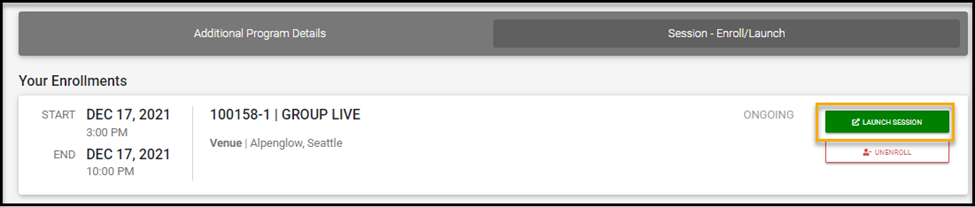
Launching a Session
Once this webcast session has been created and released to end users for enrollment on LCvista, enrolled professionals will have access to a Launch button which will appear on the day of the event, an hour ahead of the event's start time. Professionals will be navigated to Microsoft Teams upon launch.
Best Practices
There are a few items to be aware of when working with Microsoft Teams and Microsoft Forms polling:
When setting up a Microsoft Teams Meeting:
- If using the Microsoft Teams (Delegated Credential) each Meeting Organizer of a Teams Meeting will be required to set up their own credentials through Microsoft Azure. Steps for this process are listed under section Gathering API Credentials- Delegated Credentials.
- when populating the Join URL into LCvista, be sure you are using the Join URL for a scheduled Teams meeting and not using the Meet Now option. The Meet Now option will not return start/end datetime values within the Raw Data report. Duration cannot be calculated when using this Teams Meeting option.
What our integration with Microsoft Teams will not support.
Co-Presenters
Our integration with Microsoft Teams requires the Meeting Organizer of the Meeting, to match the Provider Credentials defined on the LCvista session in order for us to retrieve the data from Microsoft Teams. While a Teams Meeting Organizer can designate a Co-Presenter, and that Co-Presenter can lead the event, the actual session in LCvista must be linked to that Meeting Organizer credential, in order for the integration to work.
Event Types
Our integration with Microsoft Teams currently supports Microsoft Teams Meetings only, it is not compatible with Microsoft Teams Webinars or Live Events.
When using the Microsoft Teams Polling workflow, please take note of the following:
- Participants must be logged in to their Microsoft Teams application in order for their polling responses to return their name, and not be anonymous. The Microsoft Forms export does not include a participant’s name if the individual is not logged into their Microsoft Teams application.
- The Microsoft Forms poll export does not include data to track the Teams Meeting the polls were tied to. For this reason, we cannot validate that the Microsoft Forms polling responses uploaded, are a direct match with the Microsoft Teams Meeting they were originally linked to. It is the responsibility of the administrator uploading these files, to ensure they are uploading them to the correct LCvista session.
- The Microsoft Forms poll export does not reference the time zone of the scheduled session. For this reason, we cannot validate that the Microsoft Forms polling responses uploaded, are a direct match with the Microsoft Teams Meeting they were originally linked to. It is the responsibility of the administrator uploading these files, to ensure they are uploading them to the correct LCvista session.
- MS Team Breakout Room time is not accessible through the API calls currently available. As a result, breakout time will not be reported back in the LCvista Raw Data or Completion reports.
Teams meetings and breakout rooms
Participation time spent in breakout rooms will not be reflected in the LCvista Raw Data or Completion reports. This data cannot be displayed as it is currently not accessible through the Microsoft Teams APIs that facilitate this integration.
Polling with Microsoft Teams
The Microsoft polling application available within Microsoft Teams is a separate tool created by Microsoft Forms. Due to the current limitations of this application, our access to display polling responses for participants will work a little differently in LCvista. Read further to learn more about this workflow!
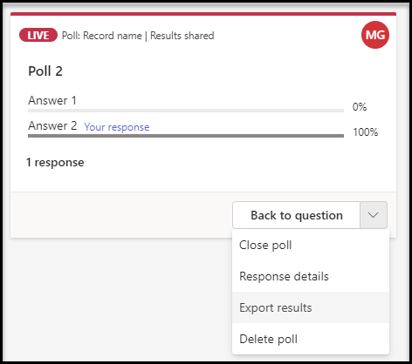
Retrieving Poll Data
Microsoft Forms polling data is available from within the Microsoft Teams Meeting. As the Meeting Organizer or Co-Presenter, you will need to export these results.
Uploading Polls
Within LCvista, the process to associate this exported polling data with your session, will follow these steps:
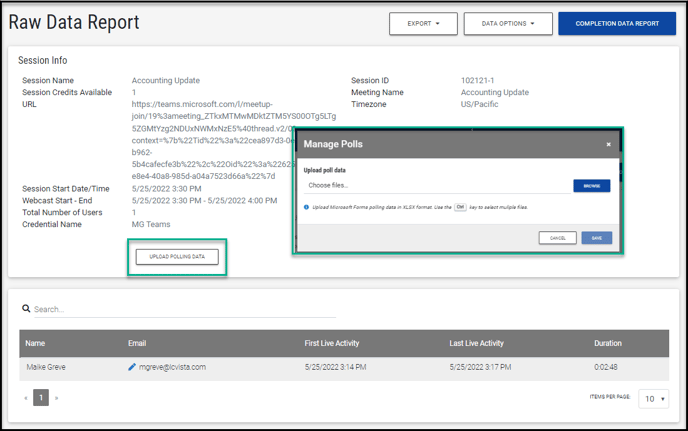
- Access your Microsoft Teams meeting and navigate to the Raw Data report
- On the Raw Data report, click on the button titled Upload Polling Data
- This button triggers a modal where an admin can choose all exported polling results from their session. Note, this file uploader has been built to handle loading multiple files at once.
- After choosing the relevant polling files, select Save.
Tip! Upload Microsoft Forms polling data in XLSX format. Use the Ctrl key to select multiple files.
Once your polling data has been loaded and saved, LCvista will reconcile the responses with the users on the Attendance report. The result will be an updated table on the Raw Data report, reflecting both Attendance data along with polling responses, per participant – just the way our current integrations work.
Note: If you do not see the Upload Polls button on your Microsoft Teams Meeting from the Raw Data report, click the Refresh Data selection within Data Options.
Updating Polls
If more polls need to be added, select the Edit Polls button to expose the modal again to continue adding files.
- If any polls need to be excluded, and should not be counted when calculating suggested credit, choose the Edit Polls button to expose the modal and select the poll in question to Exclude.
- If any polls need to be replaced, use the Edit Polls button to expose the modal and Replace the file for that particular polling question.
Once all polling questions have been uploaded, you can use the Raw Data report to review the data available from Microsoft Teams and Microsoft Forms. Continue to use the Completion Data report to see how credit is being suggested based on the Ruleset applied at the session level.
For more information on Rulesets, the Raw Data report or the Completion report, please review our article on Integrations.
Processing CPE
What happens after the event concludes? Once your event is over, you will have access to both the Raw Data report as well as the Completion report. Both will assist in processing CPE for your participants.
To learn more about reviewing the Raw Data and Completion reports and processing CPE please review article on Integrations, specifically the section on Reports: Completion Data Report.