
Our Integrations tool is an add-on feature that allows organizations with a third-party webcasting application to communicate with LCvista to process user attendance and CPE.
Reports: Completion Data Report
Modifying A Session’s Start And/ Or End Date/Time
Accounting for Changes to a Session’s Start or End Date/Time
Behavior when a LCvista Start/End Date Time does not Exist
Best Practices when Refreshing Data
Accessing Integrated Event Reports
Available Integrations
This article will highlight the overall workflow for using the Integration feature. Refer to the following guides for more information about best practices for each Integrated Provider. If this is a feature that is of interest to your firm, please contact a LCvista Representative for more details.
- Adobe Connect
- Conferences i/o
- GoToWebcast
- GoToWebinar
- Microsoft Teams
- ON24
- Pods for Adobe Connect
- Webex Events
- Webex SSO
- Zoom
Linking a Provider
If this feature has been enabled for your firm, begin setup by clicking the Integration Providers link on the left sidebar menu, under Organization.
Upon clicking this link, you will be taken into the Integration Provider Configurations menu.

To add a new provider, select Add Provider and complete the form with the required information.

The information requested is unique per provider; take note of the best practices for each Integration available. This detail can be found within the guides listed above under Available Integrations, for each integration accessible through LCvista.
Managing Rulesets
In addition to setting up your provider, you will also need to define the ruleset which should be applied to each session in order to calculate CPE for your professionals.
Rulesets are a set of rules or guidelines that define the parameters for the way in which CPE credits are calculated for participants. By default, all organizations will have the NASBA GIB ruleset. This ruleset mirrors NASBA standards for calculating CPE credit.
To add your own custom Ruleset, you will select the Add Ruleset button.

When creating a ruleset, consider the following:
- Name—This is the name of the ruleset that will display on the Rulesets page, as well as when setting up sessions and selecting your ruleset type. We recommend making this name as specific as possible.
- Make default—Do you want to make this ruleset the default when setting up all Webcast launchable content? Please note that upon using this feature the NASBA GIB ruleset will be the default.
- Rules—These are the rules that dictate the credit calculations. When creating these rules, the factors you may select are: greater than, greater than or equal to, less than, less than or equal to, or equal to the allotted number. The factor(s) may apply to:
- Attendance (mins)
- Attendance (%)
- Polls asked
- Polls answered
- Polls answered (%)
- Checked in (Group Live specific: True or False, only)
- Codewords Valid
- Codewords Valid (%)
- Credits Earned—Once the rules have been defined, make sure to enter in a credit amount that fulfills each rule. For example, if the rule is set for Attendance (min) is greater than or equal to 50, the credit amount will be 1.
- Save—Once all rules have been defined you can save the ruleset by clicking the “Save” button.
- Test Ruleset—Once the ruleset has been saved you can test the rules by clicking the “Test Ruleset” button. This will allow you to add Test Clause examples and show you what the credit calculation will be based on your current ruleset.
You can review the sessions that have been assigned to your ruleset via the Edit Ruleset form on the Session tab, as shown below.

Creating Your Session
Once set up of Provider and Ruleset is complete, you can begin creating your sessions.
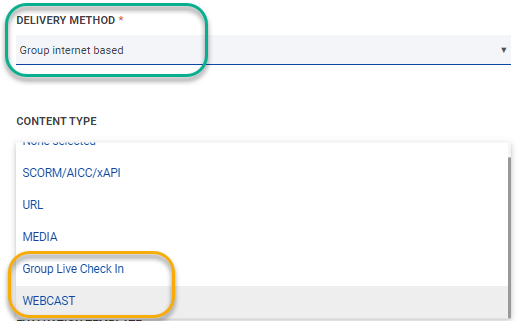
After specifying the applicable Delivery Method, the field Content Type will be exposed. Select one of the following to complete the session set up for the session:
- Webcast: applicable for group internet based events where attendance is tracked based on launch and end time and where polling is captured within the provider's application. Using this method, enrollees will have access to a LAUNCH button at session start time.
- Group Live Check-in: applicable for group live based events where attendance is tracked based on time the participant checks into live event, and end time. Using this method, enrollees will have access to a CHECK-IN button at session start time.
Once the content type has been selected, you will have access to a few additional fields:
- Integrated Provider Ruleset: Specify the ruleset you wish to be applied to participants attendance in order to calculate CPE after the event concludes.
- Select Application to Apply Ruleset for Suggested Credit: Specify the provider credentials you wish to be connected to this session. This drop down will contain all provider credentials added for your organization. The credential selected will the one used in the Raw Data and Completion reports, to suggest credit.
- Provider Specific Session Information: This will be dependent on the provider being used; the number of fields required will vary. Refer to the provider specific article for more information on best practices. Articles for each provider are available at the top of this guide, under Available Integrations.
- Launch Users into this Application: By default this value is set to Yes which means that users will be launched into the same application to participate in the session as will be used to track participation and suggest credit. In cases where you will be using two different applications, one to suggest credit and an alternate to facilitate the event, select 'No' to expose an Alternate Launch URL. Choosing this option will allow an administrator to use Conferences i/o (as an example) as the application to suggest credit, while launching users into a Teams Meeting or Zoom Webinar to participate in the event.
Please note that you will still need to input the session Field of Study and Credit value on the session level. The CPE credits specified will be evaluated alongside the Ruleset chosen and will apply to the suggested credits on the Completion Data Report for the session
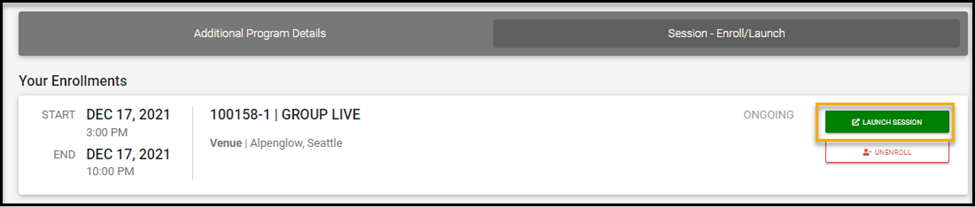
Launching the Event
Enrollees will have access to a button titled Launch Session on the day of the event, 1 hour before start time. This button will direct users into the third party application to participate in the event.
Reports: Raw Data Report
For events using content types Webcast or Group Live Check-in, administrators will have access to two additional reports. This is the first report available.
The Raw Data Report will be a snapshot of the information accessible on the third party provider platform. This data is untouched by LCvista and represents attendance and participation information captured during the event. Options are available to Export this report, either as a CSV or Excel.
Note: the time in which you can retrieve this data will be dependent on the provider. Some providers can take up to 24 hours to make this information available. To ensure you’re viewing the most current data, we recommend clicking the “Refresh Data” link available within the Data Options drop down.
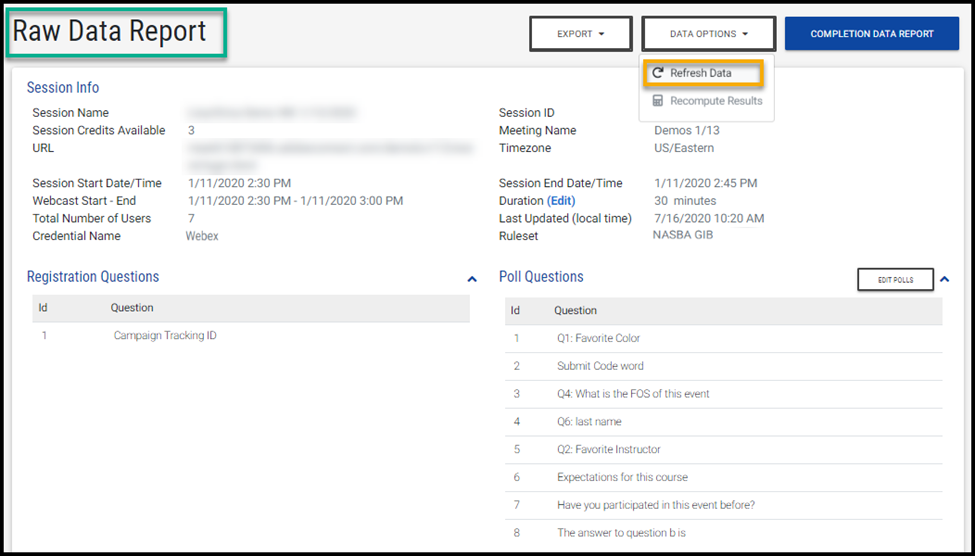
Available on this report, are 3 editable fields:
- Duration: adjust the duration to account for early starts, or mid-session breaks.
- Poll Questions: 'Ignore' polls that should not count toward the suggested CPE calculation.
- Email Address: Update email addresses to associate participants to the correct account within LCvista.
These fields are available in an editable format to allow administrators to manage exceptions that could alter the CPE calculations for an event. If any of these fields are edited, be sure to click Recompute Results to recalculate your data.
Warning: If any data points have been edited, the refresh data button should not be used unless you truly wish to override the changes you have made. A warning message will appear if you attempt to refresh the data after edits have been made to the Raw Data report.
Reports: Completion Data Report
For events using content types Webcast or Group Live Check-in, administrators will have access to two additional reports. This is the second report available.
The Completion Data Report is a report that consolidates the webcast’s Raw Data into usable metrics and applies the Ruleset associated to the session to suggest CPE credit. The top card on this report will list all the pertinent session/webcast details.
The second card on this report will list all professional data from the event, including:
- Username
- Name
- Check in method (*if a Conferences i/o event)
- Delivery method (*if a Conferences i/o event)
- Attendance (mins)
- Attendance (%)
- Response (%)
- Codewords Valid Response (%) (*if Codewords were used)
- Course Status—Passed with full credit, Passed with custom credit, Failed, Enrolled Unenrolled, No show, Incomplete Invited, and Waitlisted
- Course Credits—this is the CPE credit amount awarded on the session level
- Suggested Credit—this is the CPE credit calculation based on the applied ruleset
- Suggested Status—this is the status that is suggested based on the applied ruleset
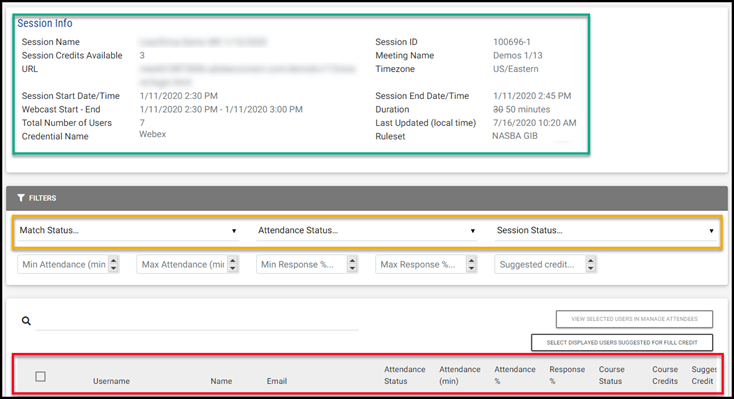
Results can be filtered in various ways:
- Match Status—this is whether we were able to match the username entered through the webcast provider interface to a username in LCvista
- Session Status
- Minimum Attendance (mins)
- Maximum Attendance (mins)
- Minimum Response (%)
- Maximum Response (%)
- Minimum Codewords Valid Response (%)
- Maximum Codewords Valid Response (%)
- Suggested Credit
When you are ready to manually process CPE, you have two options to select users in bulk.
- Option 1: Identify those that have met the criteria for Full Credit by clicking the button to Select Displayed Users Suggested for Full Credit
- Option 2: Identify the users you wish to apply an action to in bulk by checking the box to the left of their name and clicking button to View Selected Users in Manage Attendees
Both actions will direct you to the Manage Attendees screen to apply the suggestion status to the users selected. At that time, you may choose to send out a notification to the user about their status change.
Modifying A Session’s Start And/ Or End Date/Time
Accounting for Changes to a Session’s Start or End Date/Time
To help mitigate the numerous ways third-party integrations handle valid attendance time, LCvista has enhanced the way our tool suggests credit by referring to the Session Start and End Date/Time set in LCvista. This allows administrators more control over modifying sessions to ensure that attendance time is calculated to meet the specific situation at hand.
In what cases might you consider modifying the LCvista Session Start and or End Date/Time?
- The event officially started late, but users were already logged into the session. Modifying the session start time in LCvista will ensure that any attendance calculated prior will not be valid or considered when our tool suggests credit
- The event officially started early, and some users were logged in ahead of time to participate. Modifying the session start time in LCvista will ensure that attendance calculated prior will be valid and accounted for when our tool suggests credit
- The event went longer than expected. Modifying the session end time in LCvista will ensure that attendance calculated to the new end time will be valid and accounted for when our tool suggests credit
- Issues caused by Daylight Saving in third party platforms. Modifying the session start times and time zones in LCvista will ensure that attendance calculated in that defined timeframe will be accounted for when our tool suggests credit
This feature is meant to provide an administrator with full control in tracking how an event unfolded, so that our integration tool can correctly suggest credit for that scenario.
Making Modifications
If you have a session which requires a modification to the start and/or end date/time, process your change on the LCvista session form. Save your changes once complete.
Once any modifications have been made to a session’s start or end date/time, the Raw Data report will reflect a cautionary message, indicating that something has changed.
If you wish for the Raw Data and Completion reports to reflect your change, click the Data Options drop down and select Refresh Data.
Note: it is recommended that you wait to make any other modifications to the Raw Data report (Duration, Polling, Usernames) until after you have refreshed your Raw Data report to account for start or end date/time changes.
Once you have refreshed your data, the Completion report will reflect the modifications made. Attendance time will only be considered valid if the time falls between the LCvista session start and end date/time set.
There may be instances where you see this cautionary message on historical sessions. Please note, this is only a message indicating that your LCvista session start/end date time was modified and/or does not match with the time sent from your third-party provider.
No action is required as a result of this message, in cases where your event has passed and credit has been issued.
Additionally, no action is required if you do not wish to update the report to reflect the LCvista Start/End datetime change.
Behavior when a LCvista Start/End Date Time does not Exist
In cases where an LCvista start or end date time does not exist, our integration framework will refer to the start and end date/time sent from the third-party provider.
A start and end date/time can always be added later into LCvista. In these cases, these values would once again be the source of truth when determining valid participation and suggesting credit when the Raw Data report is refreshed.
Best Practices when Refreshing Data
Each third-party provider is different in determining how long an event is deemed active and when to archive or delete events.
For this reason, we suggest using caution before clicking on the Refresh Data option available from the Raw Data report. You should only select Refresh Data when you are certain the event is still active on the third-party provider platform. LCvista will be unable to retrieve this data through our integration, if the event is not available on the third-party platform.
Accessing Integrated Event Reports
There are a few different pathways to getting to these reports from within LCvista:
- Manage Attendees: If you know the event name or program ID, access these reports from Manage Attendees. Both reports will be available from within the Export Data drop down on the top right of this page.
- Integrated Providers: From within the Integrated Provider menu, access the Rulesets tab and select the option to View Associated Sessions. From this table, select the row action menu to view either report.