
This integration allows administrators access to create, manage and process CPE for Webex SSO sessions in LCvista.
Integrations
Gathering API Information
Entering Provider Credentials
Creating a Session
Launching a Session
Best Practices
Processing CPE
This integration has been retired as of Friday, March 31st, 2023.
Webex has retired Webex Events and replaced with Webex Webinars. Please navigate to our article on Webex Webinars to utilize the new integration in place.
Please take note of the following pertaining to the retired Webex SSO/Event Integration.
On Friday March 31st:
-
the option to add a new Provider using the Webex Events or Webex SSO options will no longer be available
-
the option to add a new session with the Webex Events or Webex SSO selection, will no longer be available.
-
the option to edit an existing Webex Event or SSO Integrated Provider, will no longer be available.
-
warnings will be present on existing sessions tied to Webex Events or Webex SSO; any attempted modifications to the session will fail as a result of the deprecation by Webex.
-
warnings will be present on raw data reports for both Webex Events and SSO sessions, reminding administrators of the retirement of these integrations. The option to refresh the raw data reports for these integrations will no longer be available.
Integrations
For more information on the Integrations feature, and best practices for using this workflow, please refer to our article on Integrations.
Continue reading this article to learn more about creating, managing and processing CPE for Webex SSO sessions in LCvista.
Gathering API Information
Before entering your Provider Credentials into LCvista, take note of the items which will be requested by Webex SSO:
- Name: this is the title you can give to your Webex SSO account within LCvista
- Webex Site URL: This will be your firm’s Webex URL.
- Account Email: Populate the email address that is being used for your firm’s SSO integration with Webex.
- Client ID: This value will be made available after adding a new app integration through Webex developer tools.
- Client Secret: This value will be made available after adding a new app integration through Webex developer tools.
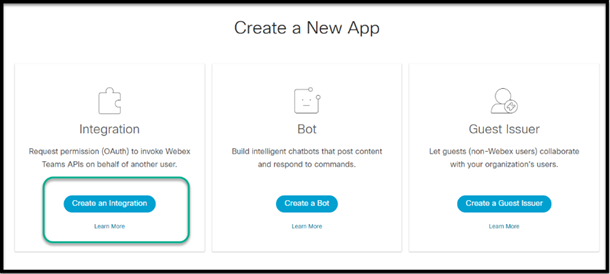
To get both the Client ID and Client Secret, you will need to add a new application via the Webex Developer site.
The steps to generate this information are as follows:
Visit the Webex Developer site to create a new client (hyperlink: https://developer.webex.com/my-apps)

Follow the steps to Create an Integration
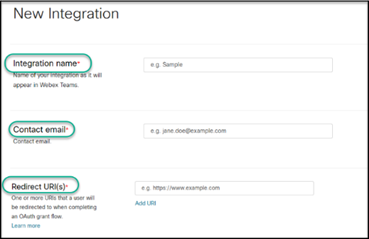
Please be sure to complete the New Integration form, paying special attention to the following fields required for this integration to be successful:
- Integration Name can be any title you wish to give this account.
- Contact email must be the email address used for your SSO integration with Webex.
- Redirect URI(s) When entering a value for the Redirect URIs, clients must append their LCvista URL with the following: /webcast_credential_proxy_in/WebexSSOUtility/ and enter this complete value into this field.
Example:
demo.LCvista.com/webcast_credential_proxy_in/WebexSSOUtility/
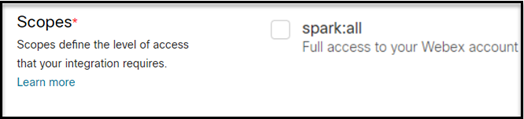
- Scopes the only requirement in this section is to check spark:all
- After completing this form, a success message will appear providing you with both a Client ID and Client Secret which will be needed for enabling this provider within LCvista.
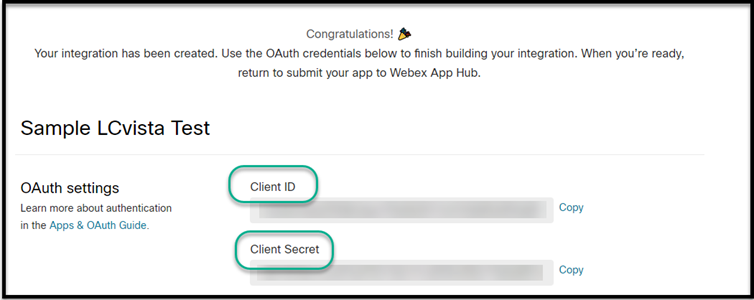
Important Note: Webex SSO will only display your Client Secret once. Please store safely in the event you need to reference again in the future.
Entering Provider Credentials
From the Provider menu within LCvista, click on the Add Provider button and enter the credentials requested below.
- Name: this is the title you can give to your Webex SSO account within LCvista
- Webex Site URL: This will be your firm’s Webex URL.
- Account Email: Populate the email address that is being used for your firm’s SSO integration with Webex.
- Client ID: This value will be made available after adding a new app integration through Webex developer tools. See above Gathering API Information for more information.
- Client Secret: This value will be made available after adding a new app integration through Webex developer tools. See above Gathering API Information for more information.
Select Validate to confirm credentials. Once they are approved, you can save. You will only need to do this once per provider.
Note: If your firm uses more than one webcast tool provider, you may add multiple providers upon setup.
Creating a Session
Once set up of Provider and Rulesets are complete, you can begin to create sessions within LCvista. For more information on creating Integrated Provider sessions, see article Integrations and the section on Creating Your Session.
In addition to the standard fields Webcast Credentials and Integration Provider Ruleset, you will be asked to provide the following additional data when creating a Webex SSO session within LCvista:
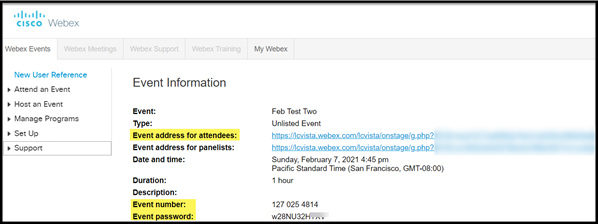
- Event Address
- Event Number
- Event Password
Please find a helpful screenshot here on where you can retrieve this detail from Webex:
Launching a Session
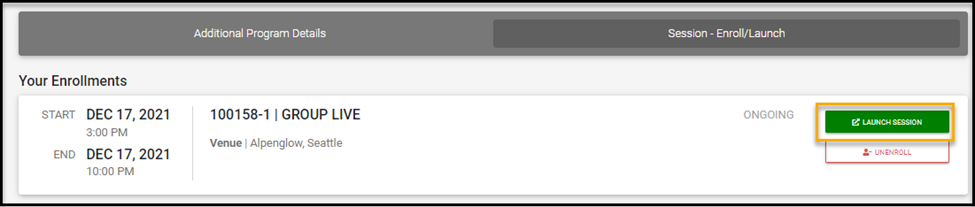
Once this webcast session has been created and released to end users for enrollment on LCvista, enrolled professionals will have access to a Launch button which will appear on the day of the event, an hour ahead of the event's start time. Professionals will be navigated to the Webex interface upon launch.
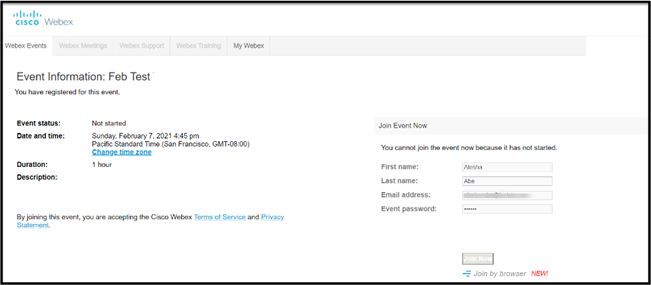
When users launch a session that is linked to Webex, they will first land on the Webex login page where the user must enter in their credentials before accessing the event.
Best Practices
There are a few items to be aware of when working with Webex SSO sessions.
- Create Unique Polling Questions. Due to limitations with WebEx, please make sure your polling questions are unique. This will ensure that the responses are captured and associated properly in the Raw Data Report. Should you choose to repeat a polling question we suggest adding a number (1, 2, 3, etc.) to the beginning of your polling question.
Processing CPE
What happens after the event concludes? Once your event is over, you will have access to both the Raw Data report as well as the Completion report. Both will assist in processing CPE for your participants.
To learn more about reviewing the Raw Data and Completion reports and processing CPE please review article on Integrations, specifically the section on Reports: Completion Data Report.