
The Bulk Uploads feature provides administrators with access to add/update fields on jurisdictions, programs, and people in bulk. This article highlights best practices for using this tool.
Navigating the Bulk Uploads Form
Bulk Uploads
This article will highlight the overall workflow for using the Bulk Upload feature. Refer to the following guides for more information about best practices for each bulk upload type.
- Earned Credit
- External Credit
- Jurisdiction Periods
- Jurisdictions
- Managed Users
- People
- Programs
- Sessions Records
- Sessions
Getting Started - Permissions
Access to this feature is included with the Default Administrator role. Providing access to this feature outside of the default administrator permission can be applied by assigning the custom role of Bulk Uploads Manager. These are the only two roles which can be applied to grant access to this feature.
A custom role can be assigned to a professional within their profile, under the Custom Roles tab. Apply access by locating the role in question and assigning to the professional.
For more information on how to assign roles to professionals, refer to our guide on Admin Roles.
Navigating the Bulk Uploads Form
Find Bulk Uploads on the left sidebar menu, under Organization. This menu is only visible to those professionals with either the Default Administrator or Bulk Uploads Manager role.
To get started, select Add New from the top right of the Bulk Uploads menu.
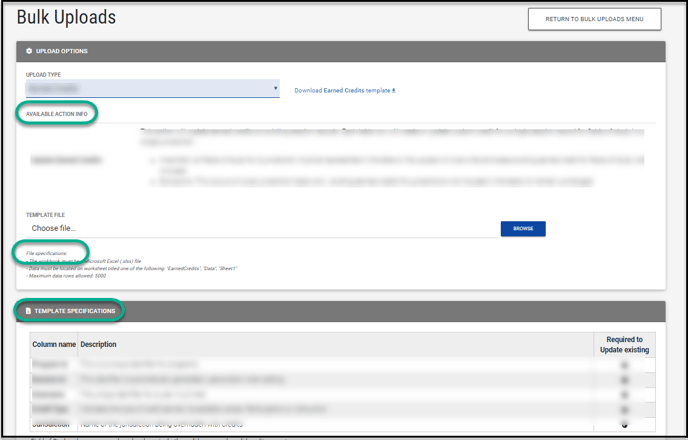
Once the Upload Type is selected you can download the appropriate template to complete.
Upload your completed template once all required fields are populated. Take note of the following:
- File Specifications: this section defines the file type and format requirements for the bulk upload in question.
- Template Specifications: this table confirms the types of updates that can be made, the column descriptions, and whether the columns are required for additions or updates.
- Available Action Info: this section will be dependent on the bulk upload type and will highlight the available actions that can be performed such as adding or updating.
If the file was loaded successfully, and the required columns were identified, you will be able to choose an action in the Type of Action dropdown.
Note: Before selecting the option to Validate Data and Preview, determine how blank cells should be handled.
For program/session related bulk uploads, you will be prompted to decide when credits are reapplied.
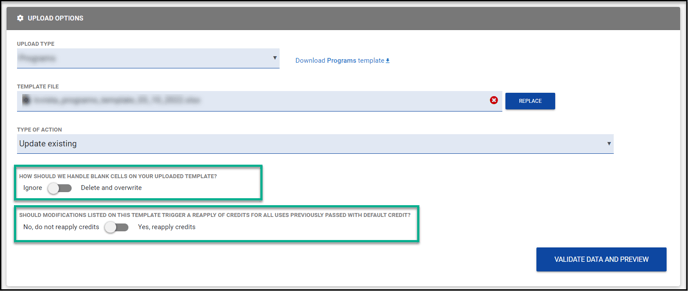
After you define the desired behavior, select Validate Data and Preview.
Previewing Data
The Bulk Uploads Preview form exposes all fields uploaded through your template. Here are some best practices for navigating this editable form:
- On the top of this form, you can filter by all rows, or those with errors.
- To the right of the filter, the number of rows with errors will be displayed.
- You can expand a row if you wish to gather more information on the error returned.
- You can also hover over the cell in question if you wish to see more detail instead of expanding the row.
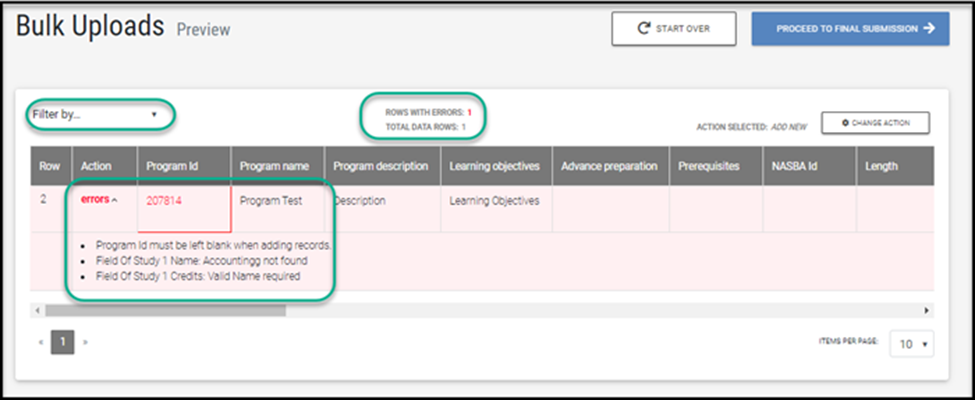
If any changes are required before proceeding, you have two choices:
- Update your file, and return to the Getting Started page via the Start Over button, and re-load your file.
- Edit the cell(s) directly from the Bulk Uploads Preview page and proceed with Validate Changes.
Final Submission
Once your file is processed without errors, select Proceed to Final Submission.
The Bulk Uploads Final Confirmation page, displays the total number of rows which will be updated and the total number of rows which are unactionable.
Select Process Request to officially make your requested changes.
Processed Requests
Once the upload is processed, you will be sent to the Bulk Upload Requests menu. This menu highlights the success status for each upload request processed. For more information on this menu, please reference our product guide for Bulk Upload Requests.